
Beyond the Box: Your Ultimate Guide to Irresistible Homemade Pasta
Imagine a plate of pasta. Not just *any* pasta, but strands so silken, so perfectly *al dente*, that each bite whispers tales of craftsmanship and love. Now, imagine that *you* made it. From flour and eggs, transformed by your own hands into a culinary masterpiece.
Sounds daunting, right? Like something reserved for nonnas in sun-drenched Italian kitchens or Michelin-starred chefs? I’m here to tell you a delicious secret: **making fresh pasta at home is not only achievable, it’s incredibly rewarding, deeply therapeutic, and tastes utterly divine.**
Forget the box. Today, we’re diving into the delightful world of homemade pasta. Get ready to awaken your inner artisan!
# Why Bother? (Beyond Just “It Tastes Better
Yes, fresh pasta undeniably tastes superior. It has a delicate chew, a porous texture that grabs sauce like a hug, and a vibrancy that dried pasta can’t match. But the real magic?
• **The Process:** There’s a zen-like quality to kneading dough, feeling it transform under your hands. It’s a mindful escape from the daily grind.
• **The Control:** You dictate the ingredients, the thickness, the shape. Dietary needs? No problem.
• **The Pride:** Serving a meal made from scratch, especially something as impressive as homemade pasta, is a feeling of immense satisfaction.
• **The Fun:** It’s a fantastic activity for a weekend afternoon, maybe with a glass of wine and some good music.
# The Myth-Busting Basics: What You’ll Ne
Let’s strip away the intimidation. You don’t need fancy equipment to start, just a few essentials:
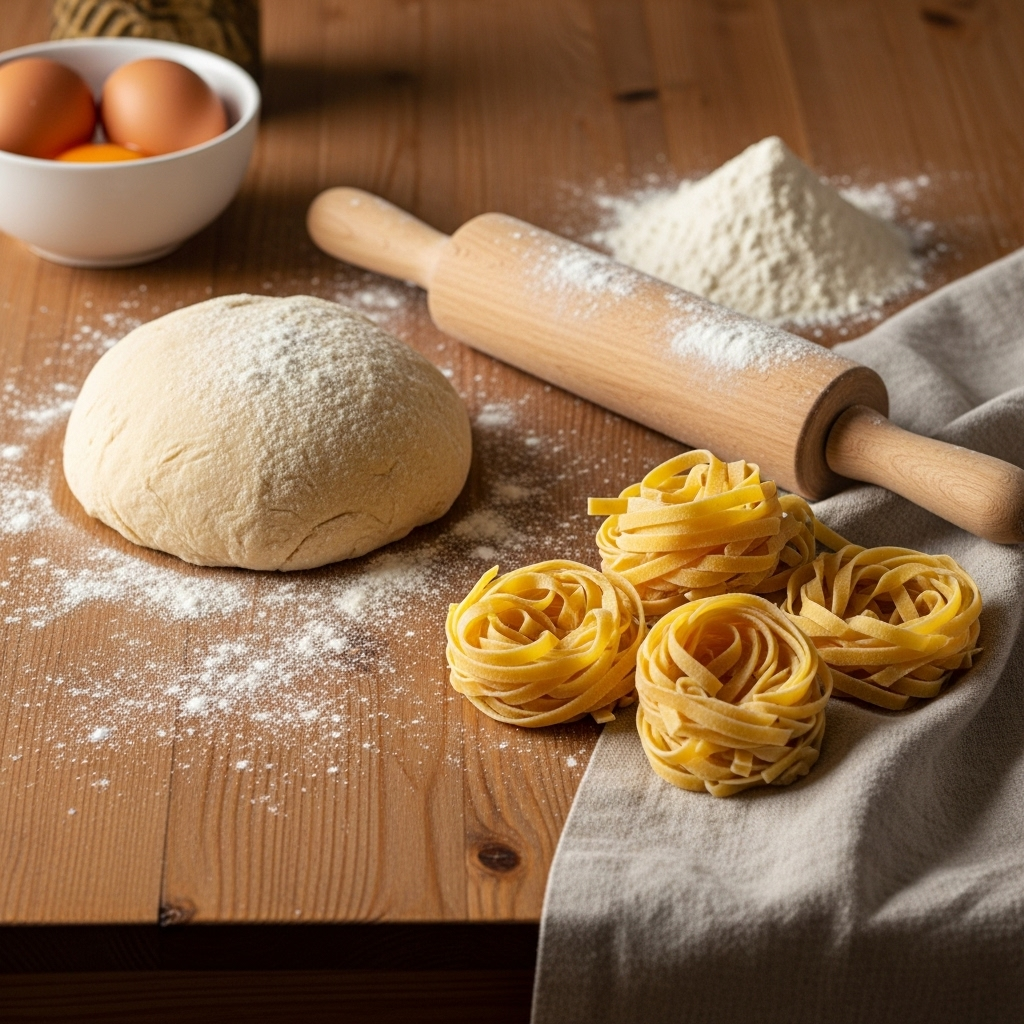
Ingredients:
• **Flour:** “00” flour (finely milled Italian flour) is ideal for its silky texture, but all-purpose flour works beautifully for beginners. Semolina flour can also be added for extra chewiness.
• **Eggs:** Large, fresh eggs are your binder and flavor base.
• **Pinch of Salt:** For flavor.
Equipment (Minimalist Approach):
• A large clean work surface (countertop or large board)
• A fork
• A rolling pin
• A sharp knife or pizza cutter
Optional (but highly recommended for convenience):
• **Pasta Machine:** A manual hand-crank machine makes rolling out thin, even sheets much easier.
• **Bench Scraper:** Invaluable for cleaning your work surface and gathering dough.
# The Golden Ratio: Your Starting Poi
For classic egg pasta, a fantastic rule of thumb is:
100 grams (approx. 1 cup) flour per 1 large egg.
This typically yields a generous single serving. So, for 2-3 people, start with 200g flour and 2 eggs.
—
# Your Step-by-Step Guide to Homemade Pasta Nirva
Ready? Let’s get our hands floury!
Step 1: The Flour Volcano
• Pile your flour onto your clean work surface.
• Using your fingers or the bottom of a bowl, create a deep well in the center, like a volcano crater. Ensure the walls are sturdy!
Step 2: The Egg Bath
• Crack your eggs into the well. Add your pinch of salt.
• Using a fork, gently whisk the eggs, slowly incorporating small amounts of flour from the inner walls of the well. Don’t rush, or your eggs will breach the walls!
Step 3: Bringing it Together
• As the mixture thickens, use your bench scraper or hands to gradually bring more flour from the edges into the wet center.
• Continue mixing until a shaggy, rough dough forms. Scrape up any bits of dough or flour from your work surface.
Step 4: The Kneading Zen
• Now, the fun begins! Knead the dough vigorously for **8-10 minutes.**
• Push the dough away from you with the heel of your hand, fold it over, rotate, and repeat.
• The dough will feel sticky at first, then gradually become smoother, firmer, and more elastic. It should spring back when lightly poked. This develops the gluten, giving pasta its chew.
Step 5: The Rest is Best
• Form the dough into a smooth ball.
• Wrap it tightly in plastic wrap (to prevent drying) and let it rest at room temperature for at least **30 minutes** (or up to 2 hours). This allows the gluten to relax, making the dough much easier to roll.
Step 6: Rolling it Out (The Magic Happens!)
If using a pasta machine:
• Cut the dough into 3-4 manageable pieces. Keep the unused pieces covered.
• Flatten one piece slightly with your hand or a rolling pin.
• Set your pasta machine to its widest setting. Pass the dough through.
• Fold the dough into thirds (like a letter) and pass it through again at the widest setting. Repeat this 2-3 times – this further strengthens the gluten and makes a smooth sheet.
• Now, gradually decrease the setting, passing the dough through each setting once, until you reach your desired thickness (usually setting 6 or 7 for most pastas, depending on your machine). You want it thin enough to almost see your hand through it, but not so thin it tears easily.
If using a rolling pin:
• Lightly flour your work surface and rolling pin.
• Roll out one piece of dough, working from the center outwards, rotating the dough frequently to keep it round and even.
• Keep rolling until it’s very thin – aim for about 1-2mm thickness. This requires some elbow grease and patience!
Step 7: Shaping Your Pasta
• Once your sheet is rolled, lightly dust it with flour.
• You can cut it into classic **fettuccine** or **tagliatelle** by loosely folding the sheet lengthwise (or into a roll) and slicing with a sharp knife to your desired width. Unfurl immediately and toss lightly with flour to prevent sticking.
• For **lasagne sheets**, simply cut into rectangles.
• For **ravioli** or other stuffed pastas, cut squares or circles and fill.
Step 8: The Moment of Truth – Cooking!
• Bring a large pot of heavily salted water to a rolling boil. (It should taste like the ocean!)
• Gently add your fresh pasta. Don’t overcrowd the pot.
• Fresh pasta cooks incredibly quickly – usually in **2-4 minutes**! It’s done when it floats to the top and is al dente (tender with a slight bite).
• Remove with tongs or a spider, letting some of the pasta water cling to the strands – this starchy water is gold for your sauce!
# Pro Tips for Pasta Perfectio
• **Humidity Matters:** On humid days, you might need a tiny bit more flour during kneading. On dry days, a drop more water (or a slightly wetter dough) helps.
• **Don’t Over-Flour:** Use just enough flour to prevent sticking, but don’t add so much that your dough becomes dry and stiff.
• **Keep it Covered:** Always keep dough you’re not actively working with covered in plastic wrap to prevent it from drying out.
• **Practice Makes Perfect:** Your first batch might not be perfect, and that’s okay! Each time you’ll get a better feel for the dough.
• **Experiment with Flours:** Try mixing “00” with semolina for a chewier pasta, or even whole wheat for a nuttier flavor.
—
You’ve done it! You’ve transformed simple ingredients into a dish that’s rich in flavor, texture, and the incredible satisfaction of creation. This isn’t just a meal; it’s an experience, a skill learned, and a tradition embraced.
So, ditch the box and embark on your own pasta adventure. Your taste buds (and your soul) will thank you.
—
Ready to embark on more culinary adventures with me? Follow along for more recipes, tips, and kitchen inspiration that turns everyday cooking into extraordinary moments!