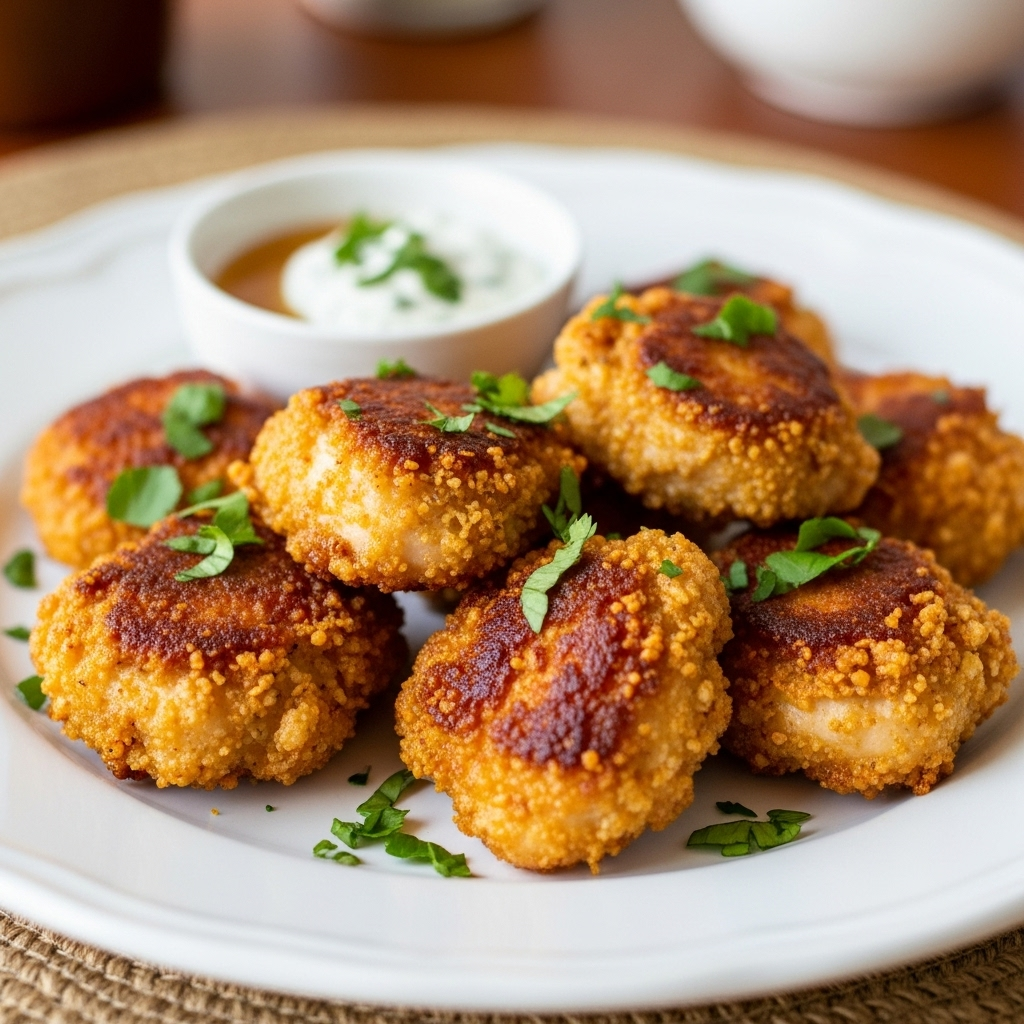
Beyond the Bucket: Unlock the Secret to Seriously Crunchy Chicken at Home! (Recipy Revealed!)
You know the sound. That glorious, shattering “CRUNCH” that reverberates through the room, signaling pure, unadulterated satisfaction. It’s the sound of perfectly cooked, golden-brown chicken – crispy on the outside, impossibly juicy on the inside.
For years, that kind of crunchy chicken felt like a restaurant exclusive, a fast-food fantasy. Our attempts at home often ended in soggy disappointment, greasy messes, or chicken that was just… “fine”. But fine isn’t what we crave when we picture that golden armor.
- What if I told you that dream isn’t just within reach, but totally achievable in your own kitchen? Today, we’re pulling back the curtain on my “Recipy Crunchy Chicken” – a method and recipe that will revolutionize your weeknight dinners and make you the undisputed champion of comfort food.
This isn’t just about frying chicken; it’s about understanding the “science” behind the crunch, the subtle tweaks that elevate a simple dish into a culinary triumph. And trust me, once you master this, there’s no going back.
—
The Anatomy of the Ultimate Crunch: My Top 3 Game-Changing Secrets
Before we dive into the exact recipe, let’s talk about the principles that make this chicken legendary. These aren’t just steps; they’re the “keys” to unlocking that elusive crunch.
1. The Brine & The Buffer: Most people skip the brine for fried chicken, but it’s crucial! A simple salt and sugar brine ensures your chicken stays incredibly juicy, seasoning it from the inside out. But here’s the kicker: after brining, we’re going to give it a quick soak in buttermilk (or a milk/vinegar concoction). This lactic acid tenderizes the meat further and, critically, provides the perfect sticky surface for our dry coating to adhere to. It’s the buffer between the juicy chicken and the crispy crust!
2. The Power Duo in Your Dry Dredge: Flour alone won’t cut it for next-level crunch. My secret weapon? A combination of cornstarch and a touch of baking powder mixed into your seasoned flour.
- Cornstarch creates a super crisp, almost glassy texture. It absorbs moisture wonderfully, preventing sogginess.
- Baking Powder reacts with the heat, creating tiny air bubbles in the coating. These bubbles expand and crisp up, giving you that incredible, light, and airy shatter. Think of it as built-in crunch enhancers!
3. The Double Dredge & The Press: Don’t just dip and fry! We’re going for a “double dredge”. First, the buttermilk-soaked chicken goes into the seasoned flour mix. Then, back into the buttermilk, and finally, for its grand finale, “back into the flour mix”. But here’s the crucial step in that final flour dredge: PRESS the flour onto the chicken firmly. You want to create lots of nooks and crannies, those beautiful craggy bits that get extra crispy and golden. Don’t be shy – really pack it on!
—
Your Recipy Crunchy Chicken: The Full Blueprint
Ready to make some magic? Here’s how to turn those principles into your new favorite dish.
- Yields: 4-6 servings
- Prep time: 30 minutes (plus 2-4 hours brining time)
- Cook time: 20-25 minutes
- Ingredients:
- For the Brine:
- 4 lbs bone-in, skin-on chicken pieces (thighs, drumsticks, wings work best)
- 4 cups water
- 1/4 cup kosher salt
- 2 tbsp granulated sugar
- For the Buttermilk Soak:
- 2 cups buttermilk (or 2 cups milk + 2 tbsp lemon juice/white vinegar, let sit 5 mins)
- 1 large egg
- For the Dry Dredge:
- 2 cups all-purpose flour
- 1/2 cup cornstarch
- 1 tbsp baking powder
- 2 tsp garlic powder
- 2 tsp onion powder
- 1 tbsp smoked paprika
- 1 tbsp dried oregano
- 1 tsp cayenne pepper (optional, for heat)
- 2 tsp black pepper
- 2 tsp kosher salt
- For Frying:
- 4-6 cups vegetable oil, canola oil, or peanut oil (enough to submerge chicken halfway)
- Equipment:
- Large pot or Dutch oven
- Meat thermometer
- Wire rack with a baking sheet
- Instructions:
1. Brine the Chicken (Crucial First Step!): In a large bowl or container, combine water, salt, and sugar. Stir until dissolved. Add chicken pieces, ensuring they are fully submerged. Cover and refrigerate for at least 2 hours, but no more than 4 hours (over-brining can make it too salty).
2. Prepare the Wet Soak: After brining, remove chicken, rinse “briefly” under cold water, and pat very dry with paper towels. In a large bowl, whisk together buttermilk and egg until well combined. Add the dried chicken pieces to the buttermilk mixture, ensuring they are fully coated. Let them soak for at least 15 minutes while you prepare the dredge.
3. Prepare the Dry Dredge: In another large bowl, whisk together flour, cornstarch, baking powder, garlic powder, onion powder, smoked paprika, oregano, cayenne (if using), black pepper, and salt. Make sure it’s thoroughly combined.
4. Heat the Oil: Pour frying oil into a large heavy-bottomed pot or Dutch oven (the larger the better for even heat). Heat over medium-high heat until it reaches 350°F (175°C) . Use a reliable thermometer!
5. The Double Dredge & Press: Working with one or two pieces of chicken at a time:
- Remove chicken from the buttermilk, letting excess drip off.
- Place it into the dry dredge, turning to coat completely.
- Dip it “back” into the buttermilk mixture briefly.
- Return it to the dry dredge for its final coating. This time, firmly press the flour mixture onto the chicken , creating those beautiful craggy bits. Don’t be shy! Place the coated chicken on a clean wire rack while you coat the remaining pieces.
6. Fry the Chicken (In Batches!): Carefully lower 2-3 pieces of chicken into the hot oil. Do not overcrowd the pot , as this will drastically lower the oil temperature and lead to soggy chicken. Fry for 6-8 minutes per side, turning occasionally, until golden brown and cooked through. The internal temperature should reach 165°F (74°C) when measured with a meat thermometer at the thickest part.
7. Rest and Repeat: Once cooked, use tongs to remove chicken from the oil and place it on a clean wire rack set over a baking sheet (this allows air circulation and prevents sogginess). Sprinkle lightly with a pinch of salt if desired. Repeat with remaining chicken, ensuring the oil returns to 350°F between batches.
8. Serve Immediately: Let the chicken rest for a few minutes before serving. This allows the juices to redistribute and keeps the crust extra crisp.
—
A Symphony for Your Senses
Get ready for that glorious moment. The first bite into this “Recipy Crunchy Chicken” isn’t just a meal; it’s an experience. The explosive crunch of the coating, giving way to unbelievably tender, flavorful meat. It’s comfort food perfected. Serve it with your favorite sides – creamy mashed potatoes, tangy coleslaw, or a drizzle of hot honey – and watch the smiles erupt around your table.
No more yearning for fast-food crunch. You now possess the power to create that magic right in your own kitchen. This isn’t just a recipe; it’s a game-changer.
—
- Tried this Recipy Crunchy Chicken? I want to see your golden masterpieces! Share your photos and stories in the comments below, or tag us on social media!
- Loved this recipe and want more game-changing culinary secrets? Make sure you hit that “Follow” button and subscribe to our newsletter! You won’t want to miss what we’re cooking up next!